Pages

Showing posts with label Pool Noodle. Show all posts

Feb 15, 2015

Five for Funday~Valentine's and some Freebies!

Why is it the short weeks sometimes feel like the longest?  We only had school 4 days this past week, but boy was I wore out by Friday. Sooo, I am linking up totally late, with Kaceyat Doodle Bugs Teaching for her Five for Friday on Funday.


This week was a full one.  I will be the first to admit, I totally dropped the ball on incorporating fun art projects into Valentine’s Day this year.  With all of our weather delay’s lately I have been playing catch up on our core subjects and it just kind of snuck up on me.  I pretty much just ran out of time.  However, I think if you ask the kiddos they still had a great time this week.  Enough about thaton to our week!


We have finished up our “L blends” and have started full force into learning our “R blends”.  The kiddos just love making our anchor charts together and it helps to really build their phonics, phonemic awareness and vocabulary skills all while having fun. 


We also started working on nouns this week.   We talked all about what nouns were and brainstormed words for each different type. Then we watched a video.  I love incorporating music whenever possible, I think it really helps the students to retain the information better.  I went old school and we watched School House Rocks, “You know they’re Nouns”.

I loved the School House Rock Videos when I was a kid, yes I am old.  It was waaay back before Disney Channel and Nickelodeon, GASP!  The only cartoons were for four hours on Saturday mornings and they always showed the School House Rock videos in between the shows.  Well they have stood the test of time, because my kiddos love all their videos.


After the video I passed out post it notes and each student had to write a word and draw a picture for “a person”, “a place” and “a thing”.  Then we added them to our interactive anchor chart.     
It came out great and best of all the kiddos really “get it”!


In math this week we practiced our place value.  We have talked about it before and use it in our calendar time. But I still had a few kiddos who just weren’t quite comfortable with it.  

So I broke out the pool noodles.  I made these this summer after seeing a great post from Mr. Greg at The Kindergarten Smorgasbord.  If you want to see my  tutorial on making your own click here.  

Any who, we all sat in a circle and away we went.  We practiced building numbers from 1-100 using our noodles.  After I was sure they could handle it each student came up and made a number all on their own.  The best part was I could choose an easier number for those kiddos who were not as advanced and I could choose more difficult ones for those students who could handle it.  They loved it and by using this hands on technique I think they all really understand it now.  We will be using  them in an independent center during math stations a few more times to reinforce this concept.


We had some fun for science this week with a Candy Heart Experiment.  I saw this on Pinterest, click here for the original pin.  I will admit however, I was expecting more.  The kiddos thought it was fun, but I had higher expectations.  I usually try these things out at home first, but I was short on time and just took the supplies in and went with it.  

You need 4 cups, one each with water, salt water, vinegar and bleach and candy hearts.  Pretty simple.  I got large candy hearts thinking we would get a bigger reaction, but it didn’t turn out that way.  Maybe they were too big and it would have been better with the small ones.  I am going to test it out next time first.   I made up this observation sheet you can download for FREE here if you want to give it a try next year.  A big shout out to Creative Clips and Kimberly Geswein for the clipart and fonts.

The first thing we did was talk about what we thought would happen when we put the hearts into the cup.  We would record our prediction on our recording sheet then put them in and watchedwaiting for something to happennothing really happened immediately with any of the solutions. Unless you count a small amount of bubbles floating up when we put them into the vinegar and bleach. So I made the executive decision that we would make our final observations after PE.


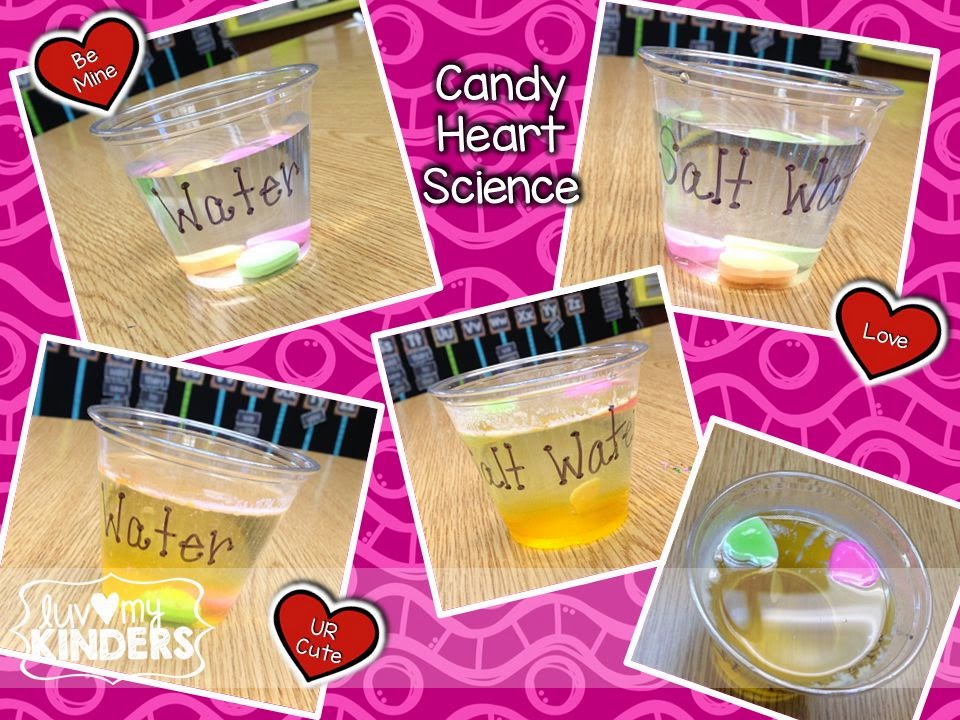
When the kiddos came back then we had something to record.  In the water they had started to disintegrate and the water was colored. Same with the salt water, plus two of them were floating.  In the vinegar they were about the same, maybe slightly more vivid color in the cup. The kiddos thought the bleach was the best reaction.  One heart was totally gone and the other two were teeny tiny.  Overall it was a fun time!


We had a great Valentine Day Celebration this week.  Here are a few of my favorite Valentine Read-a-louds.


Thursday I had passed out bags and hearts and we decorated them to put all of our valentines in.  That is what you do when you are searching through your cupboards for something to use at the last minutelol.  I live 30 minutes from town and work another 15 minutes out in the country so running to the store for supplies was out of the question.  The bags were all unique and anytime they get to have free use of glue and markers is good to go!


For our party on Friday afternoon we had stations.  I find this is the best way to conduct a party, for me at least.  They have a great time and it usually stays fairly calm.  We had four stations that they rotated to.  The first was decorating cupcakes.  We had frosting, sprinkles and several different kinds of candy to top it off.  Then they got to eat their creation and wash it down with a juice pouch.


Our second station was making homemade valentine cards for our loved ones.  I put out different papers, scissors, markers, colored pencils and glue.  They had a ball and made some great creations.
Talk about easy prep.


Station number 3 was Pin It!  They love this type of activity and it really helps to build those fine motor skills.  This cute pattern is a great FREEBIE you can find here from  Sara Connell at FirstGrade Funtastic.


This group was the cutest.  They all got their patterns and made a little circle to work on them.  It made me smile!

Station number 4 was a Graphing activity.  I put together a little baggie of treats for each student.  They had to sort, count and graph their goodies on their recording sheet.  Once it was complete they could eat their goodies.  If you want a copy of this recording sheet FREEBIE click here.  Thanks to Creative Clips and Kimberly Geswein for the great clipart and fonts.


Be sure to check out DoodleBugs Teaching to see all the other great posts.   Hope you all enjoyed your Valentine’s Day and have a wonderful week ahead.  

Jul 28, 2014

Monday Made it and a Freebie!


Well let me tell you I have been gettin’ my craft onlol.  I have to admit I didn’t start all these projects this week, but I did finish them all. 


So, I am linking up with the fabulous Tara at 4th Grade Frolics for Monday Made It!  Go check out what everyone has been making this past week, after you read my post first of course.  Be sure you stick around until the end for your freebie!


First up I made these super cute, and easy, sun catchers.  These are the brilliant idea of Cara over at Creative Playground.  She made hers on pizza pans, but I wanted mine a little smaller so I used 2 different size round cake pans. 

First gather your supplies, pony beads (the amount will depend on how big your pan is), ribbon and the pan you are going to use.  That’s itreally. I used about 1,200 beads to do 4 suncatchers.  Cara suggested 1,000 if you do the pizza pan size.


I am going to be brief in my directions, Cara’s are so fabulous and I figure why reinvent the wheel if I don’t need to.  Preheat your oven to 425.  Pour beads into your pans. No need to prep the pan the beads do not stick.   Be sure there are no large open areas.  I used 3 different beads for mine in colors to match my room.  Mine were not even all the same size, it won’t matter once they melt.  The only caution is you cannot use metallic beads as they will not melt correctly.

Put your pan(s) in the oven for 15-20 min.  There will be a small amount of odor.  Not burning, but a plasticy (not a word I know) smell.  Keep an eye on them and remove once they are all melted and look smooth.

When you remove them from the oven, QUICKLY use the end of a pencil to make a hole near one edge to put your ribbon through.  I am not kidding when I say quickly.  It is amazing how fast they start to harden.  Since I melted 2 pans at the same time I actually only took one out at a time and made the hole in it before I did the other. Well okI didn’t do that with the first batch and by the time I made the hole in the first the second was already too hard to make a nice hole.  So I had to put it back in for another 5 min to get it melty again. Lesson learned for round two. SO, learn from my mistakes if you are doing more than one at a time.  

Let them cool for 10 min. or so.  Turn your pan over and they fall right out. Add your ribbon and hang to enjoy.  I just love the way they turned out and think they add a nice touch to my plain windows. Just ignore the dirt on my windows our janitor hasn't gotten to that yet...lol. It was also a little overcast so the sun isn't as sparkly as usual.


My second project was 2 mini chart stands.  I made one for my guided reading table as well as one for my Para to use.  Again this is not my original idea.  Check out Stephanie at Falling into First for in-depth tutorial.  Here is a picture of Stephanie's.  


Here is the supply list you will need:

Lowe's Materials
 2 - 1 x 1/2 in. Side Outlet Elbow
2- 1/2 in Adapter (Slip x Thread)
2- 1/2 in Elbow (Slip)
1 - 1/2 inch PVC pipe {Cut into three 10" pieces}

I bought the 1/2 in. pipe in a 5 ft piece and cut it at home with the power saw, if you remember I love me some power toolslol.  You can also use a hand saw or I do know you can sweet talk the worker at Lowe’s to cut it for you, if you only need a few cuts. But, since I was doing several projects it was easier to just cut it at home.


I have double the supplies since I made 2 of these. Plus I was cutting the PVC for my second project, see made it #3 below, at the same time and those supplies are in the pile too.

You will also need:
Walmart or Target Materials
Duct Tape or Spray Paint (Optional)
Binder Rings


After your pieces are cut you can leave them as is, they do have some bar codes and printing on them, or you can cover them with duct tape, like Stephanie's above.  If you choose that route, leave 1 in. uncovered at each end so the pieces will slide together easily. 


I choose to spray paint mine.  I will admit, the painting does take more time.  You first need to lightly sand each piece with 400 grit sand paper so that the paint will stick. Then wash off all residue from the sanding and let dry.  Next paint your pieces.  If you lay them on wax paper to paint they will stick less than using newspaper or magazines. 
Also by doing several light coats, be sure to let it dry completely in between, you will get a more even color.   I used the cheap, .99 cents a can, flat black spray paint from Walmart.  Once you see my room reveal, you will understand the black.


Once all of the pieces are dry from paint or covered with duct tape, you just push them together.  You can glue them, but I didn’t.  If you choose to paint them they will require a little elbow grease to get them to fit together. Add your two binder rings your chart and there you have it!  Perfect for at your guided reading table or small group math.


My 3rd made it this week is a teacher Rekenrek. Once again I am a fantastic copier and this idea was from Kim Adsit at Kindergals.  Gather your materials:
Lowe’s Materials
2-22” x 1/2” PVC Pipe
2-6” x 1/2" PVC Pipe
2-2” x 1/2" PVC Pipe
2-1/2” PVC “T” Pieces
2-1/2” PVC P-Trap (HPY-507)

Other Materials (Dollar Store,Walmart or Target)
2-Pool noodles, 2 different colors
Spray Paint (Optional)


First cut all of your PVC pieces using a power saw, hand saw or bat your eyes at the little guy in the blue vest in Lowe’slol.

Again I chose to paint my pieces, you can just leave them white as well.  The duct tape doesn’t work well with this project because you want the pool noodles to slide easily on the PVC.

If you are going to paint, they will need to be prepped as I stated above in made it #2, then lay on the wax paper and do several coats of the paint.

While your pieces are drying you can measure and cut your pool noodles.  You will need 10-1” pieces of each color.  A sharp knife and cutting board work perfect for this. It cuts like butter and no mess.


 Finally, assemble according to the picture below and there you have it, your very own Rekenrek.  You might just see, I am not saying for sure, a made it in the future for a student rekenrek. Not with PVC, I am over the PVC for this summerlol.


For my final made it for the week, and something special for still reading this far in this epic novel, I have a cute back to school math FREEBIE for you. My kiddos just love to play scoot or count the room.  You can do either activity with this, and it can be easily differentiated for different levels too.


Hope that you and your kiddos enjoy it.  If you download it please leave me some love!

So what did you make this week?  I love reading your comments. 

~Laura


Jul 4, 2014

Five for Friday on Independence Day!

Happy Indpendence Day my Friends!  I am linking up with Doodle Bugs for Five for Friday! 


 This week I have been the “Queen” of PVC and Pool Noodleslol.  I posted two projects for Monday Made it that I had finished up over the weekend.  You can check those out here
.


I have been working on two other PVC/Noodle projects that I will be posting this coming Monday.  I just love being able to work on so many projects for my room during the summer.


This week I started trying to make good on my mission to get back into fitness.  My Mother-in-law and I have been walking every morning 2 miles around the fields of our houses.  I just love looking out at this view while walking. It is just so peaceful.


I know I need to step it up to really get back in shape, but I figure any amount of movement is a step in the right direction.    


I started packingsort offor my trip to Vegas this week.  I have been super busy with the family and I need to get finished ASAP.  I leave on Sunday for I Teach K and the blogger meet up.  As I was packing I realized I NEEDED a few cute new things to take with me.  So, I ran to town and found a couple of goodies to add to my suitcase. 


Of course, I seemed to stick to my go to favorite type of clothes latelymaxi’s.  What can I say, they are comfortable and forgiving for the few extra pounds I have put on.  I am going to miss my family, but I know that it is going to be a ton of fun and I am going to learn a lot.


Well, I couldn’t go to Vegas without getting ALL fixed up.  I really sort of used that as an excuse to squeeze in a day with one of my BFF’s to get pedicures and have lunch.  


We had a great time and I just love the sparkly red! 


Of course I had to get my nails freshened up and ready for the trip too...they had to match ya know!  Monica did a fabulous job, as usual.  She just knows me so well.  I love them!  What can I say...I am a little high maintenance.


Last night we had our annual BBQ with some wonderful friends to celebrate the 4th, I know it was the 3rd.  The little town next to ours always does their fireworks on the 3rd.  So we actually celebrate twice.  We spent the evening eating , visiting, eating, watching fireworks, eatingit was a great time.  The homemade ice cream was the best!
Tonight we will be attending another BBQ with my family and enjoying some more fireworks. 


Hope you all have a wonderful day celebrating all the wonderful freedoms we have in this country.  I am truly thankful for everything we have by living here and I am especially grateful to our military for keeping our country safe. 


Have a great weekendwhat are your plans for celebrating?  I love to read your thoughts and comments!


~Laura